Showing posts with label quilting. Show all posts

Sunday, June 3, 2012

Doll Quilt and Pillow

I've been into a little early Christmas gift making this year. Some of the little girls in my life will be receiving these miniature doll quilts with matching pillows.
(Sorry, I still haven't figured out how to stop my phone photos from cutting themselves off on one side.)
I love these little sets. They are made almost entirely with scraps, so are budget friendly, and they're quick to make. And, I think they're pretty adorable, too.
This one is a basic patchwork quilt, about 18 inches square. I cheated on the binding by just folding the backing over to the front. There are only two lines of quilting. Keeping it simple! The pillow is a rectangle of folded, sewed and stuffed fabric -- again, nothing fancy, but I remember loving this sort of thing when I was a kid. Feels like so long ago.

Tuesday, September 27, 2011

Butterfly Quilt for a Baby Girl

After months of procrastination, the butterfly quilt I’ve been working on is finally finished. It’s not a perfect quilt, but I like how it turned out.
finished quilt
I attempted free motion quilting on an actual quilt for the first time. I definitely need to work on my design shaping, but it was a super quick and effective way to quilt, especially since I didn’t want to quilt through the butterflies.

This quilt is made entirely from scraps and fabric that’s been in my stash for over a year. To create the butterflies, I Googled butterfly silhouettes until I found a shape I liked. I literally traced it off my laptop screen onto a piece of paper (using pencil) and then outlined the shape with dark marker. I used the tracings to make cardstock templates, and then used the templates to trace the butterflies onto fabric backed with light duty fusible web.
preparing fabrictracing butterflies
I live in a house of boys, so my pink fabric selection is limited. I dug through the scrap bin and came up with the fabrics shown above, and then arranged them all onto a large sheet of fusible before tracing the butterflies. Then I cut and cut and cut. Big job, especially all the little ones, but on the bright side, I have enough leftover to make another quilt for another little girl, set to arrive in October.

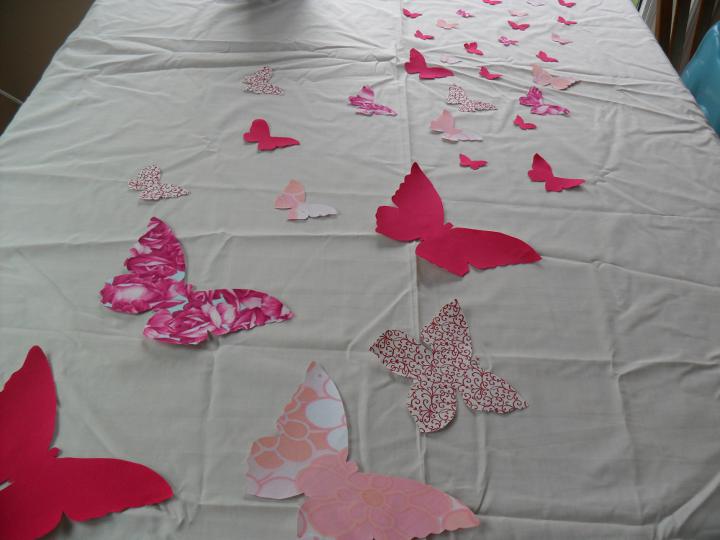
Once everything was cut out, I spread out my three sizes of butterflies on a large piece of fabric and played with the layout until it looked nice.
butterfly applique quilt layout
Ironed everything down and stitched around the outlines. Another big job, but I don’t trust the fusible on its own, especially on something likely to be washed over and over.
quilting
I truly have no idea what I’m doing when it comes to free motion stippling. I’ve practiced on felt sandwiches in the past, but this time I just took a big breath and did it. I’m sure the pattern could be neater or more predictable, but the stitches are fairly consistent and the layers are quilted together, so I’m calling it a success. Next time I will try an all-over stippling; getting around the butterflies was tricky and it shows.
The backing is made from soft, pink plaid flannel. I just folded it over from back to front to form a cheater binding. I always struggle with the binding pulling in the direction I’m sewing, so that I inevitably end up with a bubble somewhere. Any suggestions from you more experienced quilt binders?
folded
Linked to: homeworklil luna link party buttonMondays @ All Things Fee!Making Monday Marvelous Linky Party

 While He Was Napping Bundles of Baby

Monday, August 15, 2011

Summer play...

Ah, the wonderful, lazy days of summer! There's been lots of time spent outside with the kids, biking around the neighbourhood, enjoying the water, and playing with friends. Perfect!


I haven't had time for much crafting, but have managed to putter at some small projects here and there...see the sliver of blue skirt in the family photo above? It used to be a pair of too-big shorts.

The other day, hubby asked for a pouch to protect his computer in his backpack when he bikes to work. So I whipped up this little faux suede number. In the spirit of using what I have on hand, the lining is made from the bottom of a shortened bridesmaid dress and the zipper is white instead of camel (and not invisible), but you know what? Hubby couldn't care less.


More than a month ago, I started working on an appliqued baby quilt for an old high school friend expecting her first child. Well, that baby has been born, but  the quilt remains folded on my dining room table, completely unquilted. Here's a little peek from when I was playing around with the layout.

In addition to the quilt (now a priority!), my oldest son starts Junior Kindergarten in just under a month. I'd love to make him a cute backpack and maybe a matching zippered pouch to hold his spare clothes, tissues, and other things that stay at school. The urge to knit is also growing, and I've been searching out fun patterns for possible Christmas gifting.

One final summer photo...today's afternoon snack. We all love watermelon, and eat it in slices regularly, but to bump it up a little, I like to serve it as a salad -- doused in fresh lime juice, sprinkled with sea salt and ground pepper, and topped with crumbled feta and torn mint leaves. Sometimes I add a bit of onion (it's good!), but skipped that part today. Very refreshing salad.


Thursday, December 2, 2010

Secret Santa Swap!

I've been sidelined by a nasty cold and case of pink eye for the past week, but managed to eek out my Secret Santa Swap item just in the nick of time for the December 1st deadline. Now I can only hope Canada Post is speedy in delivering my package.

My swap partner is a brilliant quilter, so crafting something for her was intimidating to say the least! I wanted to make something festive, but not so Christmas-y that it couldn't be used at other times of the year. I finally decided on a quilted pillow cover using scraps from the stockings I made a while back and some plain white cotton.


The details don't show well in this photo, but the centre is a cathedral window quilt block adorned with white piping and red beads. The outside has simple diagonal quilting, and the back is a simple pocket fold made from a sturdy but unknown fabric from Switzerland. I added an ornament and card to the package, which is hopefully nearing Texas by now.

The only other non-work project I've touched in the last week is whipping up another tie t-shirt for my oldest -- his request! He managed to get ketchup on it before I snapped the photo, but I this is what is known in blogland as keepin' it real! I bought a six-pack of plain white tees and we've had a lot of fun decorating them with applique and fabric paint. Will have to dig a few of the others out of the laundry to post later.


Tuesday, October 19, 2010

Festive Christmas stocking tutorial

After catching myself singing Jingle Bells out loud to my boys at Walmart earlier today, I decided tonight would be a good time to try a Christmas craft. A couple friends have asked me to make stockings for their families, so this is the sample I made to test out my technique. I think it turned out pretty well! This stocking is quilted, cuffed and fully lined.


I've never done a craft tutorial before, so be patient with me  (=

What You Need:
-- approximately 1/2 yard if printed fabric for front and back of stocking (or a fat quarter of 2 different fabrics if you want variety. I went with this green snowflake print for both front and back).
-- same amount of a lining fabric (I used plain white)
-- 1/2 yard fusible fleece or other batting material
-- 1/4 yard contrasting fabric for cuff, or a cute trim piece like I've used.
-- thread

Step one to creating a stocking like the one above is to choose the size and shape you want. I just drew a freehand stocking shape onto a piece of unprinted newsprint and used that as my template. One of the things I considered when drawing my stocking is that I wanted the leg of the finished piece to be wide enough for a small package, oranges, etc. Some of the commercial ones are very narrow and not terribly practical.

When you're happy with the shape you've drawn, use it to cut out two pieces of fusible fleece. You can use other batting material as well, but I like the fusible because you can quickly iron it to your outside fabric and it makes it easy to quilt without pinning. Be sure to flip the fleece over for your second cut, so that you'll have the fusible part facing in the right direction when you attach it to your front/back fabric. 

Cut two rectangles of front/back fabric slightly larger than your fleece stocking shapes. Place fleece stockings, fusible side up, on your ironing board, centre the fabric (right side up) over the fleece stockings and press with a hot iron according to manufacturer's directions. It should stick very quickly. Allow the fused fabric/fleece, and then use your sewing machine to quilt whatever design you like. I used a basic diamond pattern, but I think free motion swirls would be lovely. Cut excess fabric from the edges of stocking, leaving enough for small seam allowance. Do this for both front and back.


My sewing machine came with this little bar that just slides into the presser foot shaft. It makes it easy to keep my quilt lines a uniform distance apart.


After quilting is finished, cut two stocking shapes out of lining fabric, once again turning fabric wrong side up for one of the cuts. Layer your quilted pieces right sides together and top them with your lining pieces, also right sides together.


This is how the layers should look: lining, lining, fleece/fabric, fabric/fleece. Pin all layers together, and stitch around the stocking, keeping your stitches right against the fleece edge and leaving the top of the stocking open.


Clip seams at all curves, snipping through your seam allowance, but not through the line of stitching. This will help the curves sit smoothly once they are turned to the inside.


The next two steps are where the magic happens. First, slide your hand between the two lining layers of your stocking sandwich and turn it inside out, so the lining fabric is showing on the outside of your stockings. The stitched seams should show no raw edges. Quickly press the seams. Next, slide your hand between the front/back fabric layers and turn the stocking inside out again. Voila! This should reveal the front/back fabric on the outside of the stocking while turning the lining inside and hiding all of your interior seams. The top of the stocking will still show raw edges. Sorry, I forgot to take a photo of this step.


Now that your stocking is turned out the way it will look when it's finished, you should make a hanging loop for the stocking. To do this, I used a scrap of front/back material and fold it over so that right sides were together. Then I stitched a seam approximately half an inch away from the folded edge. The total length of my loop was about five inches. Cut fabric on the side of the seam furthest from the folded edge, turn it right side out (I use a knitting needle or chopstick to assist), and press it flat, with seam in the centre. Put aside.


For the cuff on this stocking, I used two little pieces of lacy-type material I had in my stash, but you could just as easily use a rectangle of contrasting fabric sewn in half, and turned out, like a larger version of the loop. I stitched the lacy pieces together so that they formed a loop the same width as the stocking.


Place the cuff inside the stocking, with right side of the cuff facing the right side of the lining fabric. Pin into place, matching raw edges with the top of the stocking and making sure side seams are aligned. Tuck fabric loop between the cuff and lining, near the top outside corner of the stocking. The loop part should face downward, into the stocking, while the raw edges of the loop align with the raw edges of the stocking. Hope that makes sense. Stitch around the circumference of the stocking, making sure to catch all layers (lining, fleece, front/back fabric, cuff fabric and loop ends) in the seam.


I used a double zig zag stitch to clean up the raw edge a little, but it's not really necessary. Flip the cuff from the inside of the stocking, over the top and press down into place on the outside of the stocking. The cuff will self cover the seam attaching it to the stocking, and the loop will now be visible.


Your stocking is finished after the cuff is flipped to the outside, but it's fun to play around with embellishments. I auditioned a fabric rosette and some tiny adhesive bling to up the fancy factor of my stocking, but I haven't decided on either option for sure.


Once again, here's the finished product. Congratulations if you've stuck around to the end of this tutorial. I'd love to see your stockings if you decide to try one! Or if you totally love this stocking, I'll be listing it in my Etsy shop, BluePea. Thanks for reading!

Linking to:


Simpsonized Crafts


Photobucket


giveaways


Photobucket


Saturday, October 9, 2010

Baby quilt for a future lil' farmer

One of my old high school chums is expecting her first child later this month, and I'm really excited for her. She's just one of those people who you know is going to be a great mom. Anyway, she and her husband have decorated the little guy's room (they know it'll be a boy) with a farm theme, and the baby daddy is a big John Deere fan, so when I say this quilt panel on sale, I knew I had to make it up for them.

Cuddly goodness

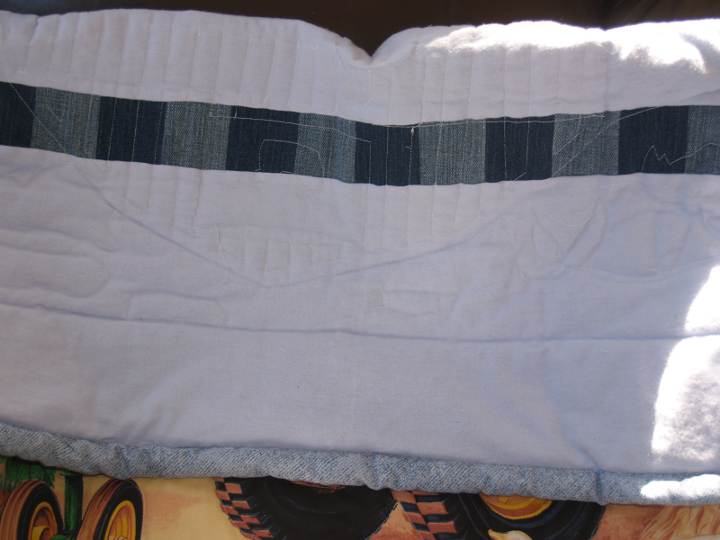
Denim strip to add length to short flannel backing!
I machine quilted around the pictures on the panel, and then rolled the edge around the backing and stitched it to the back to create a binding...and to hide the fact that my backing was a tiny bit small. I also had to add a line of denim patches to the back to make up for the flannel short fall, but it does double duty in upping the cute factor  (= . The binding looks a bit bulky in the back view photo, but it looks better in real life.

More hemming to do tonight (working toward earning enough $ to buy a coverstitch machine -- I calculated that I have to hem nearly 400 pairs of pants to buy the one I want. A little daunting, but otherwise, it's just not in our budget.) and then hopefully onto some Hallowe'en and Christmas projects. Yea, Christmas!