Showing posts with label holiday goodness. Show all posts

Friday, December 2, 2011

Handmade Gift Exchange: sent & received!

One of the things I enjoy most about the holidays is exchanging gifts with loved ones. And now, thanks to the Winter 2011 edition of the Handmade Gift Exchange at Craftaholics Anonymous, you can add exchanging gifts with strangers to that list as well!
My exchange partner was Ana, a Brazilian woman who moved to Manitoba after marrying her Canadian husband. Brr, I think I may have tried to persuade hubby to move to Brazil instead. Ana blogs at Tropical Momma -- check her out there or on Facebook, where you can see more of her Custom Art!
In any case, Ana said she liked the colour leaf green, so I went through my stash and found some leafy green yarn (I actually went to a friend's house and matched it against some of her houseplants!), and knitted up a little scarfette. You've seen this pattern from me before here. It's one of my favourite patterns to make.
Ana also has a young daughter, so I made her a quick crayon and notepad roll. I keep one of these in my bag for use in waiting rooms, restaurants, etc. Keeps the kids amused, and is easy to carry around. Hope she likes it!
And now for the really good stuff...this piece of Christmas gorgeousness is what she sent me! I love it! It arrived this morning, just in time for decorations starting to go up at our house. Thanks so much, Ana! Your work is great and I will treasure it.

Sunday, May 8, 2011

Fly, fly away...

Well, we didn't exactly fly away, but my little family did take a spur-of-the-moment helicopter tour of the city this afternoon. Now that we're back on the ground, safe and sound, I can say Coolest. Mother's Day. Gift. EVER!

Josh was captivated by the idea of flying. It was his first time.

I was wondering if this would be my final Mother's Day!

Spencer couldn't get enough of the views. He sat on Dad's lap.
Downtown, Parliament, and bridges leading to Quebec.

My view, sitting next to the pilot!
Look how tiny this helicopter is! My hubby (left) kept telling himself not to put Spencer on his shoulders as he normally does!
What an amazing experience. I've flown in commercial planes before, but this was a totally different animal.  All those windows and the very close quarters makes the flying very 'real' compared to plane, which can feel like you're barely moving, especially if you're in an aisle seat. Take off and landing were also very fun, and totally different than a plane. LOVED it!

Happy Mother's Day to you all.

Saturday, May 7, 2011

Happy Mother's Day!

Mother's Day was a sad occasion for me up until five years ago. Although I desperately wanted children,  it didn't seem to be happening for me. So as I congratulated the moms around me back then, on the inside, I was devastated. Little did I know that only days later I would discover I was pregnant with my oldest son. Now, knowing that that little body was growing inside me on that sad day, I look back at it as one of the most amazing Mother's Days of my life. Sniffle. Okay, enough mushy stuff!

Here is a little mommy-and-me apron set I whipped together for a Mother's Day Appreciation swap hosted by one of the playgroups I joined. My swap recipient likes purple, and I had this fabric in my stash, so it worked out well.


And, lucky girl that I am, this is the goodness-filled basket that was delivered to my doorstep!


Delicious chocolates, a selection of yummy teas and a card that made me giggle out loud. Perfect. Thank you!

Sunday, April 24, 2011

Easter nests

One of my fondest childhood memories is of my brother and I waking up on Easter morning and rushing to the living room to see if the Easter Bunny had left us a treat. Each year, there would be a gorgeous cedar nest on the stereo cabinet, loaded with jelly beans, chocolate eggs and bunnies. It felt like pure magic.
What I didn’t realize in those early years was that my quiet grandfather was the craftsman behind those fragrant nests. As I got older, he let me watch as he made them. It was our secret -- my little brother still believed in the Easter Bunny, or was at least clever enough to fake it, so he wasn’t invited.
Fast forward 25 years, and I have children of my own. My sweet Grampa is gone now, but his special contribution to Easter lives on in the cedar nests I now make for the great-grandchildren he never got to meet. Here is this year’s version, simple and unfussy, just as I remember them being when I was younger.
with candy
These cedar nests are like small wreaths sewn onto a cardboard backing. Here’s a brief tutorial. You’ll need:
- a large piece of cardboard, about a foot across
- twine (I was out, so used yarn)
- a darning needle
- a shopping bag full of fresh cedar branches (the tips of the branch work best, flexible and pretty)
- scrapbook or wrapping paper & glue (optional)
1. Cut circles out of cardboard. They don’t have to be perfectly round, but they should be about 11 or more inches in diameter so the centre part doesn’t get too crowded when the cedar is added.
cardboard
I had to chuckle to myself about the irony of using a cardboard box that had once held an “Eat Smart” scale to create a vessel to display Easter candy.
2. I glued some scrapbooking paper to cover the pictures. My four year old son has a freaky good memory and would catch onto the fact that I made the nests if he saw anything at all that he recognized.
3. Thread your darning needle with a long piece of twine. You will need several feet to go all the way around the wreath, but if you run out, just tie on a new length and continue. Use the needle to punch a hole through the cardboard, about 1.5-2 inches from the edge. Knot the twine together, so that it is securely attached to the cardboard.
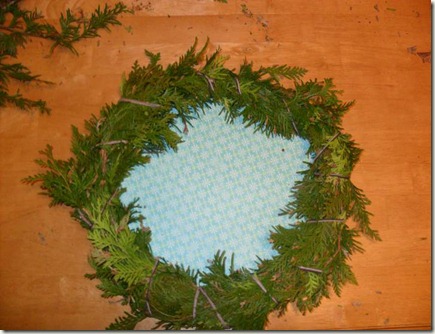
4. Gather up two or three cedar branches and place them along the edge of the cardboard. Secure with needle and twine. This first layer gets covered later on, so don’t fret too much over neatness at this point. Continue adding bunches of cedar, tucking the new stems under the ends of the existing branches, until you’ve completed the circle.
adding cedar
adding cedar closeup
first round done
5. Your nest will be looking a bit shaggy at this point. Time to fix that! Cut some smaller lengths of cedar and begin tucking the stems under the twine loops and into the tied down foliage. The idea is to cover the twine and to add substance to the nest.
adding top pieces
6. Again, continue adding smaller pieces until you are satisfied with the look and shape of the nest. Give the edges a haircut if necessary, and embellish if you want to (I didn’t).
finished
7. Fill with candy or other treats and watch your children’s faces light up on Easter morning. My parents used to nestle our goodies in that fluffy, shredded filler stuff, but since I used scrapbook paper on the bottom, I skipped this.
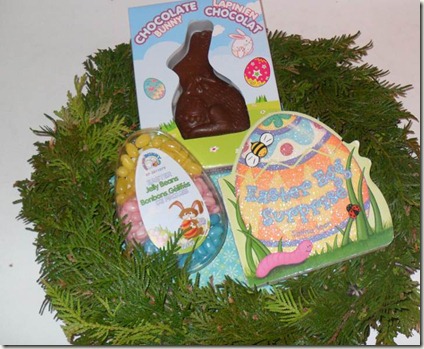
with candy
Happy Easter!

Update! Now that Easter is over, we extended the life of our cedar nests by adding some simple foam letters (my youngest loves these, and picked the colours!) and hanging it on the front door. It's not the most sophisticated look, and I don't know how long the cedar will last (it's starting to dry out), but for now it's cheery and fun -- just what my boys and I love!


Linked to:

Visit thecsiproject.com

Photobucket craft Keeping It Simple
Photobucket
Mondays @ All Things Fee!

Saturday, October 31, 2009

Where'd October go?

I'm sitting here shaking my head in disbelief that October is already over. Where'd it go? And what have I been doing?

I did manage to complete a couple projects, including these super-cute jack-o-lantern candle holders, which I had perched in my window for the trick-or-treaters to see tonight. Can't take credit for the idea -- it came from another blog (Not So Idle Hands), which I love, but I did change them up a bit with painted lids. The lids are mostly to keep my boys from dumping out the tealights inside. My oldest hides them and my youngest would eat them (=


Sorry for the blurry pic...I couldn't find my tripod, and I've apparently grown shaky in my thirties!

I've also spent a lot of free time working on odd job sewing projects for others. With all the panic about H1N1 swine flu making people lose their minds, I've been selling a few of these shopping cart handle covers.


I'm a germaphobe (despite my messy house), so have been using one of these for years, but now that germs are on everyone else's minds, too, I might add a few to my Etsy shop and see what happens. A long time ago, I read somewhere about an experiment to test all the nasty stuff that could be found on an average shopping cart. The list was LONG and gross, and included feces. Enough said.

October 18th was the highlight of my month...it was the date of the annual Glebe Fabric Fleamarket, so of course I stocked up on lots of odds and ends, including some great pure virgin wool that I got for a steal of a deal. Love it!