With the calendar speeding toward Christmas, my family and I had to put aside our collective illness to get ready. There are still several gifts to make and mail (thank goodness for Express service!), but our semi-decorated tree is up, there are garlands hanging here and there, and the stockings are hung from a shelf -- they have to stay there, out of little boy reach, until they can be moved to the fireplace for Christmas morning. We've also been baking cookies, making ornaments and went out to the local Christmas Parade of Lights. In no particular order, here are some of the highlights:
 |
| Decorating the tree with toy hamsters and Hot Wheels |
 |
| Snuggling in a pillow fort |
 |
| Yummy decorated sugar cookies to eat and share |
 |
| Pretty lights, blurry tree (= |
 |
| Not even 2 yrs old and master of the rolling pin! |
 |
| Hot hubby & my 'baby' boy at the parade |
I've been working to clear out my list of custom Christmas projects for others, so I haven't had much time for my own crafts. I did get another dino mat finished from the gift list, and also whipped up a couple of these pot holder-topped dishtowels. My kids are forever pulling the towels off the front of the stove, so this little design is perfect. I'm not sure of the original source of this idea, but a fellow mommy from my playgroup found it online somewhere, and it ended up becoming a group project for some of us trying to make homemade Christmas gifts. Seriously though, I'm keeping mine for myself!
I don't have work-in-progress photos (naptime is getting shorter and shorter), but these are so simple that I'm sure you can figure it out. Any questions, just ask!
1. Choose a cute kitchen towel and coordinating pot holder. I picked up these festive versions for $1 each at Walmart.
2. Fold towel in half the short way to find the middle.
3. Run a long, gathering stitch (5.0 stitch length on my machine) across the middle of the towel. Just leave the ends unsecured. No bartacking!
4. Pull on the bobbin thread (the lower one) to gather the towel until it is the width of your pot holder.
5. With towel face up, and pot holder face down and centred over the gathering stitches, pin the pot holder in place and stitch it down to the towel. I didn't bother pinning -- this is pretty much a no-fail kind of project. Stitch slowly, and use a longer stitch length, since the layers will be fairly thick. Depending on if your pot holder's hanging loop is centred or on a corner, you may have to orient the pot holder diagonally, instead of horizontally as I did with mine in the photo below.
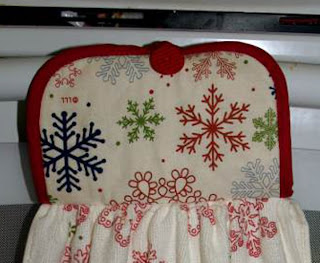 |
| Hmm, button doesn't look so off-centre in real life. You can do it better! |
6. If your gathering stitches are showing and that bothers you, use a seam ripper to pull them out.
7. Sew a cute matching button to the side of the pot holder opposite the loop. This is how you will attach the towel to your oven handle. You can do this by hand, but I was lazy and used the zig-zag function on my sewing machine for a super-quick result.
8. Hang your 5-minute masterpiece and enjoy. You're done!
Just for kicks, here's the most recent dino mat:
 |
| No cave on this one. |
I'll probably be making the few remaining ones like this. The cave on my earlier mats was fun (I thought), but my three-year-old informed me it's better to have more ground for the dinosaurs to walk on, and that the embroidered pterodactyl is much cooler overall. Guess I should have consulted the expert before I started! The zippered back passed the pre-schooler test, so it stays (=
I hope everyone is having a great time getting ready for Christmas. It's such a magical time of year, so enjoy!
P.S...For anyone interested, here is the recipe for the sugar cookies, from an amazing foodie blog called
Moogie & Pap (I drool every time a new post hits my reader!):
No-Fail Sugar Cookies
Ingredients:
6 cups flour
2 teaspoons vanilla
3 teaspoons baking powder
1 teaspoon salt
2 cups sugar
2 cups butter (4 sticks)
2 eggs
Directions:
1. Cream sugar and butter until fluffy, about 5 minutes. Add eggs and flavoring. Mix dry ingredients in separate bowl and add to butter mixture. Mix well.
2. Put a handful of the freshly made dough onto a floured work service. Roll to desired thickness and cut out cookies. Repeat with the rest of the dough.
3. Bake at 350 degrees for 8 to 10 minutes. Let cool and decorate
Linked to: